Getting to know the CockroachDB 'demo' feature


Getting started with CockroachDB demo
Prerequisite
Download the CockroachDB binary from this location (MacOS, Linux or Windows available)
What is the CockroachDB demo?
The cockroach demo command starts a temporary, in-memory CockroachDB cluster of one or more nodes, with or without a preloaded dataset, and opens an interactive SQL shell to the cluster.
- All SQL shell commands, client-side options, help, and shortcuts supported by the cockroach sql command are also supported by cockroach demo.
- The in-memory cluster persists only as long as the SQL shell is open. As soon as the shell is exited, the cluster and all its data are permanently destroyed. This command is therefore recommended only as an easy way to experiment with the CockroachDB SQL dialect.
- By default, cockroach demo starts in secure mode using TLS certificates to encrypt network communication. It also serves a local DB Console that does not use TLS encryption.
- Each instance of cockroach demo loads a temporary Enterprise license that expires after 24 hours. To prevent the loading of a temporary license, set the --disable-demo-license flag.
- cockroach demo opens the SQL shell with a new SQL user named demo. The demo user is assigned a random password and granted the admin role.
Lets get Started
Open a terminal and type the following command: cockroach demo --nodes=9 --global --with-load
Once the command has executed you will see similar information to that in the following image.

In memory we have created a 9 node, 3 region cluster which we can query and work with to get a feel for CockroachDB and how it works.
Take a look in your terminal window and notice that the demo instantiation information provides us with a username and password which was created automatically as part of the demo start-up process and allows us to log into and use the database web console (DB Console) included in the download.
By default this is available to view and interact with at http://localhost:8080

Username: demo
Password: <found in the startup information in the terminal window>
Once we have successfully logged in we are presented with the screen below:
It provides us with an overview of the cluster state and also allows us to view the location of our nodes from a geographical perspective if we click on the Node Map option as highlighted

We can view our individual nodes graphically as well as in the default descriptive format

On the left hand menu pane there are options for viewing cluster metrics, cluster activity and various other maintenance and performance metrics. Take some time to explore each one to familiarize yourself with what the DB console offers.
We can also generate diagnostic bundles from this console which prove particularly handy when assistance is required from our global dedicated support team.
Lets flip back to the console and run some other commands to query and interrogate the database which was created for us as part of the demo instantiation.
1. Let’s show the tables inside our database. At the command prompt inside the terminal we ran the demo command from, type the following:
show tables;

We can see that the movr database created during demo startup contains six tables and we can see from this view the estimated rows in each table.
2. Let’s now attempt to query one of the tables. Run the following command:
Select * from rides;
Once the query is completed we can see an interesting snippet of information

This informs us that the combined execution time, which includes the actual query execution time by the database coupled with any network usage overhead has resulted in a query time of 102ms
3. If we want to see more information on query execution times and the effect they have on the database flip back into the DB console in the browser window opened previously and select the SQL Activity menu from the left hand menu pane.
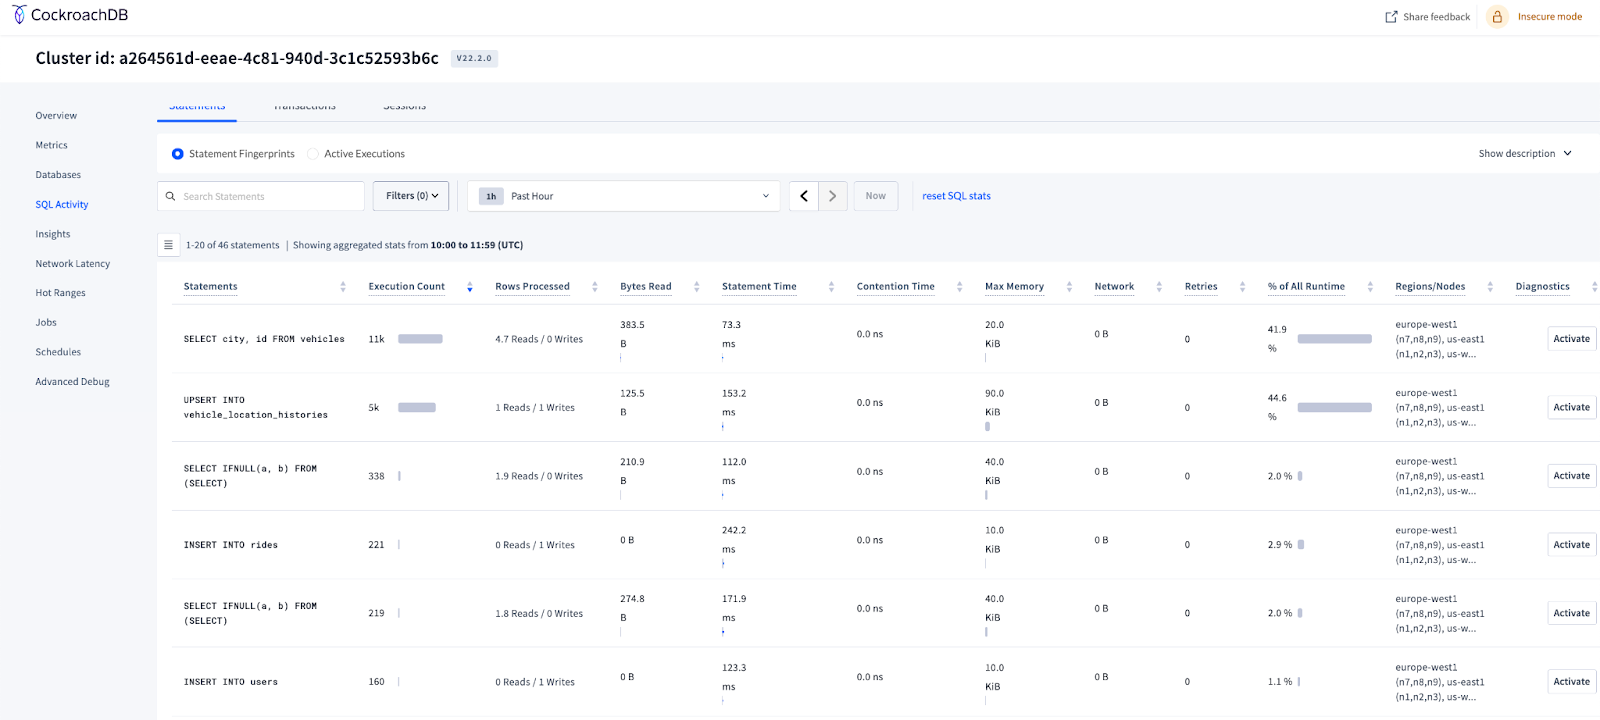
We can search for our query and from this screen determine some important metrics regarding the execution of our SQL statement.
Once we are finished exploring the DB Console and the demo features we can use the switch q command to close down the demo instance and kill off the browser session
At the command prompt type:
\q
This will end the session
Here are some extra commands you can use while working with the demo instance of CockroachDB. As a disclaimer, some of these are experimental and could change in future releases.
\demo ls
list the demo nodes and their connection URLs.
\demo shutdown <nodeid>
stop a demo node.
\demo restart <nodeid>
restart a stopped demo node.
\demo decommission <nodeid>
decommission a node.
\demo recommission <nodeid>
recommission a node.
\demo add <locality>
add a node (locality specified as "region=<region>,zone=<zone>”).
Have fun exploring!!